Claude Code: Comprehensive Learning Notes
Table of Contents
- Architecture & Core Concepts
- Memory & Context Management
- Agents & Orchestration
- Extension Framework
- CLI Commands & Keyboard Shortcuts
- Safety & Control

Claude Code Note
1. Architecture & Core Concepts
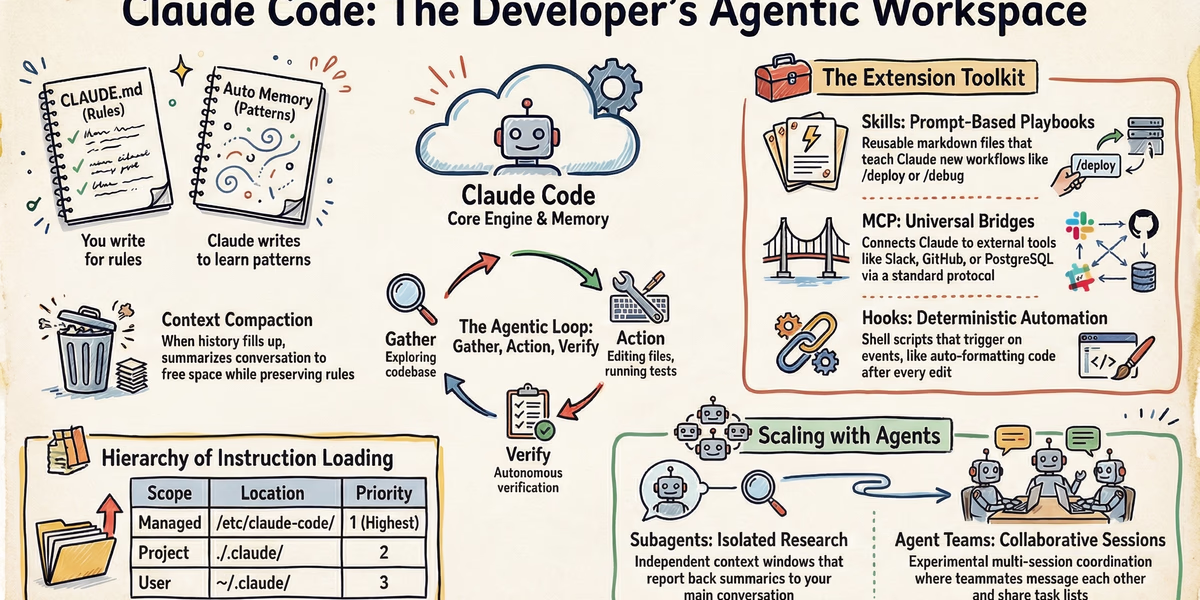
Claude Code is an agentic terminal-based assistant designed to function as an “agentic harness” around Claude models. Its architecture is built on a continuous loop of reasoning and action, allowing it to perform complex tasks like code refactoring, bug fixing, and codebase research autonomously.
1.1 The Agentic Loop
Claude Code operates through a three-phase cycle that adapts to the task at hand:
- Gather Context — Searches files and explores the codebase to understand the requirements.
- Take Action — Using built-in tools, it edits files, runs shell commands, or searches the web.
- Verify Results — Runs tests or build commands to ensure the changes are correct.

Agentic Loop
This loop is powered by Models (the reasoning engine) and Tools (the mechanism for action). While Sonnet is typically used for coding, Opus is available for complex architecture, and Haiku is often used for fast, low-latency subagent tasks.
1.2 Knowledge & Persistence Layers
Claude Code manages project-specific information through several layers of memory and context:
| Layer | Description |
|---|---|
| CLAUDE.md | A markdown file you write to store persistent project conventions, build commands, and “always-on” rules. Re-injected into every session, even after context compaction. |
| Auto Memory | Notes that Claude automatically writes for itself based on your corrections and preferences. Stores debugging insights and project patterns across sessions. |
| Context Window | The “active memory” holding the current conversation, file contents, and tool outputs. When full, Claude performs automatic compaction to summarize history and free space. |
2. Memory & Context Management
2.1 CLAUDE.md — Persistent Instructions
CLAUDE.md is a markdown file used to provide Claude with persistent context and instructions that carry across sessions. Unlike “Auto Memory,” which Claude writes for itself, you are responsible for writing and maintaining CLAUDE.md files.
Scope & Locations
CLAUDE.md files can exist at multiple levels, with more specific locations taking precedence over broader ones:
| Scope | Location | Purpose |
|---|---|---|
| Managed Policy (org-wide) | /etc/claude-code/CLAUDE.md (Linux) | IT/DevOps for security policies and company standards |
| Project Instructions (team-shared) | ./CLAUDE.md or ./.claude/CLAUDE.md | Project architecture, build/test commands, shared workflows |
| User Instructions (personal) | ~/.claude/CLAUDE.md | Personal preferences and styling shortcuts across all projects |
How Claude Uses It
- Initial Loading: Claude reads these files at the start of every session by walking up the directory tree from your current path.
- Context Treatment: Treated as context, not enforced configuration. Delivered as a user message immediately following the system prompt.
- On-Demand Subdirectories: While ancestor files load at launch, CLAUDE.md files in subdirectories load only when Claude reads files within those specific directories.
- Persistence: Instructions in CLAUDE.md are preserved during context compaction (
/compact), whereas conversational instructions are lost.
Best Practices
- Keep it Concise: Target under 200 lines per file. Large files consume excessive context tokens and can reduce Claude’s adherence to the rules.
- Be Specific and Verifiable: Use concrete instructions like
"Use 2-space indentation"rather than vague ones like"Format code properly". - Structured Formatting: Use standard markdown headers and bullets. Claude scans these structures similarly to a human reader.
- Modularize Knowledge:
- Use the
@path/to/filesyntax to import other documents (like a README or AGENTS.md) without duplicating text. - For large projects, split instructions into the
.claude/rules/directory to keep them modular and scoped to specific file paths.
- Use the
- Automate Setup: Use the
/initcommand to have Claude analyze your codebase and automatically generate a starting CLAUDE.md. - Avoid Contradictions: Periodically review files to ensure rules don’t conflict, as Claude may pick one arbitrarily if they do.
2.2 Auto Memory — Self-Written Notes
Auto memory is a mechanism that allows Claude to automatically accumulate knowledge, patterns, and insights across sessions without manual intervention. Unlike CLAUDE.md, which contains instructions written by you, auto memory contains notes that Claude writes for itself based on your corrections and preferences.
~/.claude/projects/<project>/memory/
├── MEMORY.md          # Concise index, loaded into every session
├── debugging.md       # Detailed notes on debugging patterns
├── api-conventions.md # API design decisions
└── ...                # Any other topic files Claude creates
Example of MEMORY.MD
How It Works
- Decision-Making: Claude does not save information every session; instead, it evaluates whether a specific detail (like a debugging insight or a build command) would be useful in a future conversation before deciding to remember it.
- Storage and Structure: Memories are stored locally on your machine in markdown format at
~/.claude/projects/.
3. Agents & Orchestration
3.1 Subagents
Subagents are specialized AI assistants within Claude Code designed to handle specific tasks in their own isolated context windows. They help preserve the main conversation’s context by offloading verbose operations—like searching code, running tests, or processing logs—to a separate window, returning only a summary to the user.
How They Work
- Each subagent operates with a custom system prompt, specific tool access (e.g., read-only), and independent permissions.
- Delegation: Claude can automatically delegate tasks to them based on their descriptions, or you can invoke them explicitly using
@-mentions (e.g.,@agent-reviewer). - Limitation: Subagents work within a single session and cannot spawn other subagents.
Types of Subagents
| Type | Description |
|---|---|
| Built-in | Includes Explore (fast, read-only research), Plan (context gathering), and General-purpose (complex multi-step tasks). |
| Custom | You can create your own subagents using Markdown files with YAML frontmatter to define their behavior and capabilities. |

/agents to check/create sub-agents
Best Practices for Subagents
- Design Focused Agents: Each subagent should excel at one specific task (e.g., a “Debugger” or “Code Reviewer”).
- Limit Tool Access: Grant only the necessary permissions (e.g., no edit access for a reviewer) to improve security and focus.
- Write Detailed Descriptions: Claude relies on the
descriptionfield to decide when to proactively delegate tasks. - Isolate High-Volume Output: Use subagents for tasks like running tests or fetching docs to prevent your main conversation from reaching its context limit too quickly.
- Version Control: Store project-specific subagents in
.claude/agents/so they can be shared with your team via Git.
3.2 Agent Teams (Experimental)
Agent Teams allow you to coordinate multiple independent Claude Code sessions working together on a shared goal.
- Architecture: One session acts as the team lead, which coordinates work, assigns tasks, and synthesizes results from teammates.
- Coordination: Unlike subagents, teammates share a common task list and can communicate directly with each other via a messaging mailbox.
- Interaction: You can interact with teammates directly by cycling through their sessions (using
Shift+Down) or viewing them in split panes (via tmux or iTerm2). - Activation: This feature must be manually enabled by setting the
CLAUDE_CODE_EXPERIMENTAL_AGENT_TEAMSenvironment variable to1.
Best Practices for Agent Teams
- Team Size: Start with 3–5 teammates; larger teams increase coordination overhead and token costs without proportional speed gains.
- Size Tasks Appropriately: Break work into self-contained units (e.g., one function or one test file) so teammates don’t wait on each other.
- Avoid File Conflicts: Ensure teammates own different sets of files to prevent them from overwriting each other’s work.
- Provide Context: Teammates do not inherit the lead’s conversation history; you must include task-specific details in the spawn prompt.
- Monitor and Steer: Do not leave teams unattended for long; check progress and redirect their approach if they get stuck or waste effort.
- Use Adversarial Structures: For debugging, assign teammates competing hypotheses to ensure multiple angles are investigated thoroughly.
3.3 Subagents vs. Agent Teams — Comparison
| Feature | Subagents | Agent Teams |
|---|---|---|
| Context | Shared session; results return to caller. | Fully independent context windows. |
| Communication | Report back to main agent only. | Teammates message each other directly. |
| Coordination | Main agent manages all delegation. | Shared task list with self-coordination. |
| Best For | Focused, summarized, read-only, or high-volume tasks. | Complex work requiring collaboration, debate, or parallel ownership. |
| Token Cost | Lower; results are summarized. | Higher; each teammate is a full separate instance. |

Comparison of Subagents and Agent Teams
4. Extension Framework
4.1 Skills — Prompt-Based Playbooks
Skills are reusable toolkits that extend Claude’s capabilities by providing detailed instructions, custom commands, or specialized background knowledge. They allow Claude to perform complex workflows like large-scale refactors, visual report generation, or multi-step deployments.
How Skills Work
Claude uses skills as prompt-based playbooks. Unlike hard-coded commands, a skill tells Claude how to orchestrate its existing tools (like shell access or file editing) to achieve a goal.
- Automatic Discovery: Claude automatically scans for skills in your personal directory, project root, and nested directories (ideal for monorepos).
- Invocation:
- Manual: You type
/skill-namein the terminal. - Automatic: Claude “decides” to load a skill if your request matches the description in the skill’s metadata.
- Manual: You type
- Advanced Execution: Skills can be configured to run in a forked subagent, which creates an isolated context for complex tasks to prevent polluting your main conversation history.
Structure & Scope
A skill is organized as a directory containing a mandatory entrypoint file and optional supporting assets.
SKILL.md Structure:
- YAML Frontmatter: Configures how the skill behaves (e.g., its name, description, whether it can be automatically invoked, and which model or subagent to use). Example:
---
name: my-skill
description: What this skill does
disable-model-invocation: true
allowed-tools: Read, Grep
---

Your skill instructions here...- Markdown Content: The core instructions Claude follows. Supports string substitutions (like
$ARGUMENTSor$Nfor user input) and shell execution (using!commandsyntax) to inject live data into the prompt before Claude sees it. - Supporting Files: You can include templates, example outputs, or scripts (Python, Bash, etc.) in the same directory to keep the main instruction file clean.
Scope Hierarchy: If skills share the same name, they are prioritized by location: Enterprise > Personal > Project.
Structure of a skill directory:
my-skill/
├── SKILL.md           # Main instructions (required)
├── template.md        # Template for Claude to fill in
├── examples/
│   └── sample.md      # Example output showing expected format
└── scripts/
    └── validate.sh    # Script Claude can execute
Types of skill content
- Reference content: knowledge that Claude applies to current work, including conventions, patterns, style guides, domian knowledge, etc. Example:
---
name: api-conventions
description: API design patterns for this codebase
---

When writing API endpoints:
- Use RESTful naming conventions
- Return consistent error formats
- Include request validation- Task content: step-by-step instructions for a specific actioon, like deployments, commits or code generation. Example:
---
name: deploy
description: Deploy the application to production
context: fork
disable-model-invocation: true
---

Deploy the application:
1. Run the test suite
2. Build the application
3. Push to the deployment target
Available string substitutions
Skills support string substitution for dynamic values in its content. Example:
---
name: session-logger
description: Log activity for this session
---

Log the following to logs/${CLAUDE_SESSION_ID}.log:

$ARGUMENTS
Best Practices for Skills
- Keep it Lean: Target under 500 lines for the main
SKILL.md. Move heavy reference material, API specs, or scripts into supporting files within the skill directory. - Front-load Descriptions: Keep skill descriptions under 250 characters, as longer ones are truncated in the UI to save context space.
- Control Side Effects: Use
disable-model-invocation: truefor skills that perform actions like/deployor/commit. This ensures Claude doesn’t execute them unless you explicitly tell it to. - Use Subagents for Research: For “read-only” or research-heavy tasks, set
context: forkand use the Explore agent. This lets the skill run in isolation and return only a summary. - Leverage Extended Thinking: Include the word
"ultrathink"in your skill content to enable Claude’s advanced reasoning capabilities for that specific task. - Specificity: Use concrete, verifiable instructions rather than vague requests.
- Inject Dynamic Context: Use shell execution (
!command) to pull in live data or use string substitutions for user input to make skills adaptable to different situations. Example of shell execution in a skill:
---
name: pr-summary
description: Summarize changes in a pull request
context: fork
agent: Explore
allowed-tools: Bash(gh *)
---

## Pull request context
- PR diff: !`gh pr diff`
- PR comments: !`gh pr view --comments`
- Changed files: !`gh pr diff --name-only`

## Your task
Summarize this pull request...- Run skills in a forked subagent for complex tasks to prevent polluting your main conversation history and to leverage specialized tools or models. Example:
---
name: deep-research
description: Research a topic thoroughly
context: fork
agent: Explore
---

Research $ARGUMENTS thoroughly:

1. Find relevant files using Glob and Grep
2. Read and analyze the code
3. Summarize findings with specific file references
4.2 MCP — Model Context Protocol
The Model Context Protocol (MCP) is an open-source standard designed to be a bridge between AI applications (the host) and external tools, databases, or APIs (the server). It provides a universal way for AI models to access the specific context and actions they need to complete complex tasks.
How MCP Works
The protocol operates through a client-server architecture where an MCP host establishes a dedicated connection to one or more MCP servers via a client component.
- Architecture Layers:
- Data Layer: Uses JSON-RPC 2.0 to define the protocol (tools, resources, prompts).
- Transport Layer: Manages the communication channel (Stdio for local processes or HTTP for remote services).
- Lifecycle: Begins with an initialization handshake where the host and server negotiate protocol versions and discover capabilities.
- Primitives — three main types of contextual information:
- Tools: Executable functions the AI can invoke (e.g., searching an API).
- Resources: Data sources the AI can read (e.g., a database record).
- Prompts: Templates that help structure how the AI interacts with the user.
- Execution: When a model decides to use a tool, the AI application intercepts the call, routes it to the correct MCP server, and returns the result back to the conversation flow.
How to add MCP Servers
- Add a remote HTTP Server:
# Basic syntax
claude mcp add --transport http <name> <url>

# Real example: Connect to Notion
claude mcp add --transport http notion https://mcp.notion.com/mcp

# Example with Bearer token
claude mcp add --transport http secure-api https://api.example.com/mcp \
--header "Authorization: Bearer your-token"- Add a local stdio Server:
# Basic syntax
claude mcp add [options] <name> -- <command> [args...]

# Real example: Add Airtable server
claude mcp add --transport stdio --env AIRTABLE_API_KEY=YOUR_KEY airtable \
  -- npx -y airtable-mcp-server
Manage MCP Servers
# List all configured servers
claude mcp list

# Get details for a specific server
claude mcp get github

# Remove a server
claude mcp remove github

# (within Claude Code) Check server status
/mcp
Example: PostgreSQL Integration
Once the server is added, you can ask Claude Code a natural language query like: “Find emails of 10 random users who used feature ENG-4521.” Claude Code discovers the “query” tool provided by the database server, executes the necessary SQL through the MCP connection, and integrates the results directly into your session.

List out available mcp servers
Best Practices for MCP
- Use the Right Transport: Use HTTP for connecting to cloud-based services and stdio for local scripts or tools that need direct system access.
- Select Appropriate Scopes: Use Project scope (
.mcp.json) to share tool configurations with your team via version control, and User scope (~/.claude.json) for personal utilities used across multiple projects. - Keep Descriptions Concise: Ensure server instructions and tool descriptions are under 2KB, as Claude Code will truncate longer text.
- Use Variable Expansion: Utilize
${VAR}syntax in your configuration files to handle machine-specific paths or sensitive API keys securely. - Audit for Security: Only install MCP servers from trusted sources, as servers that fetch untrusted content can expose your session to prompt injection risks.
- Leverage Tool Search: For sessions with many tools, keep
ENABLE_TOOL_SEARCHactive (the default) to reduce context window usage by only loading tool definitions when they are needed.
4.3 Hooks — Lifecycle Automation
Hooks are user-defined shell commands that execute automatically at specific points in the Claude Code lifecycle. They provide deterministic control over the assistant’s behavior, ensuring certain actions—like formatting code or sending notifications—always occur rather than relying on the model to choose to run them.
How Hooks Work
Hook events fire at specific lifecycle points in Claude Code. When an event fires, all matching hooks run in parallel, and identical hook commands are automatically deduplicated.
List of available events:
| Event | Description |
|---|---|
| SessionStart | When a session begins or resumes. |
| UserPromptSubmit | When you submit a prompt, before Claude processes it. |
| PreToolUse | Before a tool call executes. Can block it. |
| PermissionRequest | When a permission dialog appears. |
| PostToolUse | After a tool call succeeds. |
| PostToolUseFailure | After a tool call fails. |
| Notification | When Claude Code sends a notification. |
| SubagentStart | When a subagent is spawned. |
| SubagentStop | When a subagent finishes. |
| TaskCreated | When a task is being created via TaskCreate. |
| TaskCompleted | When a task is being marked as completed. |
| Stop | When Claude finishes responding. |
| StopFailure | When the turn ends due to an API error. Output and exit code are ignored. |
| TeammateIdle | When an agent team teammate is about to go idle. |
| InstructionsLoaded | When a CLAUDE.md or .claude/rules/*.md file is loaded into context. Fires at session start and when files are lazily loaded during a session. |
| ConfigChange | When a configuration file changes during a session. |
| CwdChanged | When the working directory changes, for example when Claude executes a cd command. Useful for reactive environment management with tools like direnv. |
| FileChanged | When a watched file changes on disk. The matcher field specifies which filenames to watch. |
| WorktreeCreate | When a worktree is being created via —worktree or isolation: “worktree”. Replaces default git behavior. |
| WorktreeRemove | When a worktree is being removed, either at session exit or when a subagent finishes. |
| PreCompact | Before context compaction. |
| PostCompact | After context compaction completes. |
| Elicitation | When an MCP server requests user input during a tool call. |
| ElicitationResult | After a user responds to an MCP elicitation, before the response is sent back to the server. |
| SessionEnd | When a session terminates. |
Hooks communicate with Claude Code using standard system streams and exit codes:
| Stream / Code | Behavior |
|---|---|
| stdin | When an event triggers, Claude Code passes event-specific data (like tool inputs or session status) as JSON to the hook’s stdin. |
| stdout | Your script tells Claude Code what to do — context injection or structured JSON decisions. |
| stderr | For error messages and reasons for blocking. |
| Exit 0 | Typically allows the action to proceed. |
| Exit 2 | Blocks the action and feeds the reason back to Claude as feedback. |
Types of Hooks
Hooks support four execution models tailored to different use cases:
| Type | Description | Best For |
|---|---|---|
| command | Executes a shell command with event data passed as JSON via stdin. | Fast, deterministic actions like formatting or notifications. |
| prompt | Presents a prompt to the user and captures their response to make a decision. | Quick judgments requiring human input. |
| agent | Spawns a temporary subagent to analyze the codebase and return a decision based on its findings. | Complex verification requiring code analysis. |
| http | Sends an HTTP request to an external service with event data, allowing for integrations like Slack notifications or custom dashboards. | External integrations and real-time monitoring. |
Hook Input
Every event includes common fields like session_id and cwd, but each event type adds different data. Example:
{
  "session_id": "abc123",          // unique ID for this session
  "cwd": "/Users/sarah/myproject", // working directory when the event fired
  "hook_event_name": "PreToolUse", // which event triggered this hook
  "tool_name": "Bash",             // the tool Claude is about to use
  "tool_input": {                  // the arguments Claude passed to the tool
    "command": "npm test"          // for Bash, this is the shell command
  }
}
Hook output
| Exit Code | Behavior |
|---|---|
| 0 | The action proceeds. |
| 2 | The action is blocked. |
| Other | The action proceeds. |
| Example: |
#!/bin/bash
INPUT=$(cat)
COMMAND=$(echo "$INPUT" | jq -r '.tool_input.command')

if echo "$COMMAND" | grep -q "drop table"; then
  echo "Blocked: dropping tables is not allowed" >&2  # stderr becomes Claude's feedback
  exit 2                                               # exit 2 = block the action
fi

exit 0  # exit 0 = let it proceed
How to Use Hooks
- Configuration: Add a
hooksblock to a settings file.- Global hooks:
~/.claude/settings.json - Project-specific hooks:
.claude/settings.json
- Global hooks:
- Filtering: Use matchers to target specific events (e.g., matching only “Edit” tool calls). The
iffield (v2.1.85+) allows filtering based on specific tool arguments. - Verification: Use the
/hookscommand in the terminal to browse, test, and confirm which hooks are active for your current session.
Example: Auto-format Code After Edits
This hook automatically runs Prettier on every file Claude modifies to maintain consistent formatting. It uses a PostToolUse event with a matcher for Edit or Write tools:
{
  "hooks": {
    "PostToolUse": [
      {
        "matcher": "Edit|Write",
        "hooks": [
          {
            "type": "command",
            "command": "jq -r '.tool_input.file_path' | xargs npx prettier --write"
          }
        ]
      }
    ]
  }
}
The hook parses the JSON input to find the edited file path and passes it directly to the formatter.
Best Practices for Hooks
- Narrow Matchers: Keep matchers as specific as possible to avoid triggering hooks on unrelated events, which can waste time and context.
- Silent Shell Profiles: Wrap any
echostatements in your shell profiles (like.zshrc) in an interactive-only check; otherwise, profile output will corrupt the JSON communication between Claude and your hook. - Use Absolute Paths: Reference scripts using absolute paths or the
$CLAUDE_PROJECT_DIRvariable to prevent “command not found” errors. - Permissions: For decisions requiring judgment, use prompt hooks for speed and agent hooks when you need to verify the actual state of the codebase.
- Executable Rights: Ensure any hook scripts you create are executable using
chmod +x.
4.4 Plugins — Packaging & Distribution
A plugin is a packaged directory that extends Claude Code by bundling together multiple features—including skills, custom agents, hooks, and MCP servers—into a single, shareable unit. While standalone configurations (stored in your .claude/ directory) are best for personal or project-specific experiments, plugins are designed for reusability across multiple projects and distribution to teams or the wider community via marketplaces.
How Plugins Work & Their Structure
Every plugin lives in its own directory and is defined by a manifest file located at .claude-plugin/plugin.json, which contains metadata like the plugin’s name, version, and description.
The plugin’s functionality is organized into specific subdirectories at the root level:
| Directory | Location | Purpose |
|---|---|---|
.claude-plugin/ | Plugin root | Contains plugin.json manifest (optional if components use default locations) |
commands/ | Plugin root | Skills as Markdown files |
agents/ | Plugin root | Custom agent definitions |
skills/ | Plugin root | Agent Skills with SKILL.md files |
hooks/ | Plugin root | Event handlers in hooks.json |
.mcp.json | Plugin root | MCP server configurations |
.lsp.json | Plugin root | LSP server configurations for code intelligence |
settings.json | Plugin root | Default settings applied when the plugin is enabled |
Best Practices for Plugins
- Start Simple: Begin with a standalone configuration in your
.claude/directory for quick iteration; only convert it into a plugin once you are ready to share it across projects or teams. - Follow the Root Structure: Ensure all functional directories (like
skills/orhooks/) are at the plugin root level, not inside the.claude-plugin/folder, which should only hold the manifest. - Use Namespacing Wisely: Plugin skills are always prefixed with the plugin name (e.g.,
/plugin-name:skill). Choose a concise, unique name in your manifest to keep these commands easy to type. - Test Locally and Iterate: Use the
--plugin-dirflag when starting Claude Code to load and test your plugin during development without a full installation. Use/reload-pluginsto apply changes instantly without restarting the session. - Prepare for Distribution: Before sharing, add a
README.mdwith usage instructions and ensure you are using semantic versioning in your manifest to track releases. - Leverage Default Settings: Use a
settings.jsonfile in your plugin root to automatically activate a specific custom agent as the main thread when the plugin is enabled.
4.5 Skills vs. Tools vs. MCP — Comparison
| Feature | Skills | Tools | MCP |
|---|---|---|---|
| Nature | Prompt-based playbooks and workflows. | Built-in fixed logic (e.g., ls, grep). | Open standard to connect external data (Slack, DBs). |
| Customization | Easily written in Markdown/YAML. | Requires core development. | Requires setting up an MCP server. |
| Logic | Flexible; Claude interprets instructions. | Deterministic; executes exact code. | Bridge between Claude and external APIs. |
4.6 Plugins vs. Standalone Skills vs. MCP — Comparison
| Feature | Standalone Skill | MCP Server | Plugin |
|---|---|---|---|
| Primary Goal | Quick project-specific automation. | Connecting to external data/APIs. | Packaging and sharing complex toolkits. |
| Organization | Stored in .claude/commands/. | Often standalone servers or JSON configs. | A unified folder with a plugin.json manifest. |
| Naming | Simple names like /deploy. | N/A (invoked via tools/prompts). | Namespaced like /my-plugin:deploy to avoid conflicts. |
| Distribution | Manual copy-paste between projects. | Server-based; requires client setup. | Installed via /plugin install or marketplace. |
5. CLI Commands & Keyboard Shortcuts
5.1 Core Operations & Project Setup
| Command | Description | When to Use |
|---|---|---|
/init | Initialize project with a CLAUDE.md guide | Setting up a new project with recommended structure |
/plan <description> | Enter plan mode directly from the prompt | Breaking down tasks before implementation |
/help | Show help and available commands | Learning about available CLI commands |
/login | Sign in to your Anthropic account | Starting a new session or re-authenticating |
/logout | Sign out from your Anthropic account | Ending your session securely |
/exit (Aliases: /quit) | Exit the CLI | Closing the application |
/doctor | Diagnose and verify installation and settings | Troubleshooting setup or connectivity issues |
5.2 Memory & Context Management
| Command | Description | When to Use |
|---|---|---|
/memory | Edit CLAUDE.md memory files and auto-memory | Managing persistent context across sessions |
/context | Visualize current context usage as a colored grid | Understanding how much context you’re using |
/compact [instructions] | Compact conversation with optional focus | Freeing up context when reaching capacity |
/clear (Aliases: /reset, /new) | Clear conversation history and free up context | Starting fresh without historical context |
/copy [N] | Copy the last response (or Nth-latest) to clipboard | Saving assistant responses for reuse |
/rewind (Alias: /checkpoint) | Rewind to a previous point in the conversation | Undoing changes or exploring different approaches |
/export [filename] | Export conversation as plain text | Saving or sharing conversation records |
5.3 Extension & Agents Management
| Command | Description | When to Use |
|---|---|---|
/agents | Manage agent configurations | Setting up or switching between custom agents |
/skills | List available skills | Discovering available automation playbooks |
/plugin | Manage Claude Code plugins | Installing, enabling, or disabling plugins |
/reload-plugins | Reload all active plugins without restarting | Applying pending plugin changes instantly |
5.4 Configuration & Settings
| Command | Description | When to Use |
|---|---|---|
/config (Alias: /settings) | Open the Settings interface | Adjusting theme, model, output style, and preferences |
/keybindings | Open or create keybindings configuration file | Customizing keyboard shortcuts |
/theme | Change the color theme | Switching between light/dark or colorblind-accessible themes |
/color [color|default] | Set the prompt bar color for current session | Visual session identification |
/vim | Toggle between Vim and Normal editing modes | Switching editor keybinding styles |
/privacy-settings | View and update privacy settings | Controlling data privacy preferences |
/statusline | Configure Claude Code’s status line | Customizing the display line information |
5.5 Model & Performance
| Command | Description | When to Use |
|---|---|---|
/model [model] | Select or change the AI model | Switching between Claude versions or capabilities |
/effort [low|medium|high|max|auto] | Set the model effort level | Balancing response quality and speed |
/fast [on|off] | Toggle fast mode on or off | Optimizing for latency vs. quality |
/cost | Show token usage statistics | Tracking API costs and usage |
/usage | Show plan usage limits and rate limit status | Monitoring subscription limits |
/extra-usage | Configure extra usage for when rate limits are hit | Continuing work during rate limit periods |
/upgrade | Open the upgrade page to switch plan tiers | Changing subscription level |
5.6 Session Management
| Command | Description | When to Use |
|---|---|---|
/add-dir <path> | Add a new working directory to current session | Managing multiple project directories |
/rename [name] | Rename the current session | Organizing sessions for easy identification |
/resume [session] (Alias: /continue) | Resume a conversation by ID or name | Continuing work from a previous session |
/branch [name] (Alias: /fork) | Create a branch of the conversation at this point | Exploring alternative approaches |
/status | Show version, model, account, and connectivity info | Checking current session configuration |
/stats | Visualize daily usage, session history, and streaks | Analyzing usage patterns |
/insights | Generate a report analyzing your sessions | Understanding interaction patterns and friction points |
/tasks | List and manage background tasks | Monitoring long-running operations |
5.7 Development Tools
| Command | Description | When to Use |
|---|---|---|
/security-review | Analyze pending changes for security vulnerabilities | Checking git diff for security risks |
/diff | Open an interactive diff viewer | Reviewing uncommitted changes and per-turn diffs |
/pr-comments [PR] | Fetch and display comments from a GitHub pull request | Reviewing PR feedback without switching tabs |
/terminal-setup | Configure terminal keybindings | Setting up Shift+Enter and other shortcuts |
/hooks | View hook configurations for tool events | Managing automation hooks and events |
5.8 Integrations & External Tools
| Command | Description | When to Use |
|---|---|---|
/mcp | Manage MCP server connections and OAuth authentication | Connecting to external data sources and APIs |
/chrome | Configure Claude in Chrome settings | Setting up the Chrome extension |
/desktop (Alias: /app) | Continue the current session in Desktop app | Switching from CLI to desktop interface |
/remote-control (Alias: /rc) | Make session available for remote control from claude.ai | Enabling web control of local sessions |
/remote-env | Configure default remote environment for web sessions | Setting up remote execution environments |
/install-github-app | Set up the Claude GitHub Actions app | Enabling GitHub integration |
/install-slack-app | Install the Claude Slack app | Enabling Slack notifications and integration |
/ide | Manage IDE integrations and show status | Integrating with VS Code or other IDEs |
5.9 Account & Miscellaneous
| Command | Description | When to Use |
|---|---|---|
/btw <question> | Ask a quick side question without adding to conversation | Getting quick answers without cluttering context |
/feedback [report] (Alias: /bug) | Submit feedback about Claude Code | Reporting issues or suggesting features |
/mobile (Aliases: /ios, /android) | Show QR code to download the Claude mobile app | Setting up mobile access |
/stickers | Order Claude Code stickers | Getting branded merchandise |
/release-notes | View the full changelog | Reviewing recent feature updates |
/voice | Toggle push-to-talk voice dictation | Using voice input for commands |
/schedule [description] | Create, update, list, or run Cloud scheduled tasks | Automating repetitive tasks |
/passes | Share a free week of Claude Code with friends | Sharing access with others |
6. Safety & Control
Architecture-level safety is managed through Permissions and Checkpoints:
- Permissions: You control Claude’s level of autonomy, ranging from Plan Mode (read-only) to Auto-accept edits or Auto mode.
- Checkpoints: Claude snapshots files before editing them, allowing you to undo changes instantly if an approach is unsuccessful.