
State management can be a huge topic in UI frameworks like Vue and React. Fortunately, there are many methods and libraries that we can use directly. In this article, I want to discuss my understanding and practices on state management in different scenarios. Since these are based on my past experiences, some methods and libraries that I have not used before are not included.
what’s state management
State is a place where we store all the data. In React, we often decouple different functions and UIs into different components to enhance code reusability. Basically, each component has its own state and will use data in its state to render the UI. So, here comes a problem: what happens when we want to use another component’s state? That’s where state management tools come in. By using state management tools, we can freely use state from other components and pass state to other components.
3 types of components structure
Firstly, I want to discuss the different component structures in which state transmission is required. There are mainly three scenarios: peer components, which are rendered at the same level in the DOM tree; parent-child components, in which the child component is nested inside the parent component and also rendered by the parent component; and ancestor-descendant components, in which the descendant component is nested in the ancestor component but is different from parent-child components. The descendant component is not directly rendered by its ancestor component, and usually, some middle layers are included.
- peer components

- parent-child components

- ancestor-descendant components

5 methods/libs for state management
-
props
In some situation, we could directly use props to pass value from parent to child or from child to parent. props: easy to use, no 3rd party libs needed cons: could only pass value between parent and child, if data exchange between peer components or ancestor-descendant components is needed, we need to store state in the highest level (such as: App component), which is inconvenient
parent to child:
// pass state by props in parent component
import { Child } from './Child';
import './App.css';

function App() {
  const count = 0
  return (
    <div className="App">
      <Child count={count} />
    </div>
  );
}

export default App;
// get props from params in child component
export const Child = (props)=>{
console.log(props)
return (
<div>
{props.count}
</div>
)
}child to parent:
import { Child } from './Child';
import './App.css';
// pass a callback function to child by props
function App() {
  const getCount = (cnt)=>{
    console.log(cnt)
  }

  return (
    <div className="App">
      <Child getCount={getCount} />
    </div>
  );
}

export default App;
// receive function, pass data as param into it
export const Child = (props)=>{
const count = 99
props.getCount(count)
return (
<div>
{count}
</div>
)
}peer components: init state at highest level component (ex. App), pass state and func to its children (peers)
import { Peer1 } from './Peer1';
import {Peer2} from './Peer2'
import './App.css';
import { useState } from 'react';
// pass a callback function to child by props
function App() {
  const [count,setCount] = useState(0)
  const changeCount = (param)=>{
    setCount(param)
  }
  return (
    <div className="App">
      <Peer1 changeCount={changeCount} />
      <Peer2 count={count} />
    </div>
  );
}

export default App;
// change state from peer1
export const Peer1 = (props)=>{
return (
<div>
<button onClick={()=>props.changeCount(999)}>change count from peer1</button>
</div>
)
}// retrive state from peer2
export const Peer2 = (props)=>{
return (
<div>
peer2: {props.count}
</div>
)
}-
context
Context is often used to pass value to deeper components, especially useful in ancestor-descendant structure.
Usually two API are widly used: createContext(defaultValue), useContext(SomeContext)
import { createContext, useContext } from 'react';

function App() {

  const [theme, setTheme] = useState('dark');
  const [currentUser, setCurrentUser] = useState({ name: 'Taylor' });
  //create Context
  const ThemeContext = createContext(null)
  const AuthContext = createContext(null)

  // expose context and provide value to be passed in Context
  return (
    <ThemeContext.Provider value={theme}>
      <AuthContext.Provider value={currentUser}>
        <Page />
      </AuthContext.Provider>
    </ThemeContext.Provider>
  );
}

// Use Context in descendant components by useContext hook.
function Page() {
  const theme = useContext(ThemeContext)
  const currentUser = useContext(AuthContext)
  return (
    <div>
      {theme} {currentUser}
    </div>
  )
}-
PubSub
Easy to use, Publish-Subscribe model Official Docs: https://github.com/mroderick/PubSubJS#readme
import PubSub from 'pubsub-js'

// create a function to subscribe to topics
var mySubscriber = function (msg, data) {
    console.log( msg, data );
};

// add the function to the list of subscribers for a particular topic
// we're keeping the returned token, in order to be able to unsubscribe
// from the topic later on
var token = PubSub.subscribe('MY TOPIC', mySubscriber);

// publish a topic asynchronously
PubSub.publish('MY TOPIC', 'hello world!');

// publish a topic synchronously, which is faster in some environments,
// but will get confusing when one topic triggers new topics in the
// same execution chain
// USE WITH CAUTION, HERE BE DRAGONS!!!
PubSub.publishSync('MY TOPIC', 'hello world!');

// unsubscribe this subscriber from this topic
PubSub.unsubscribe(token);
import { Peer1 } from './Peer1';
import {Peer2} from './Peer2'
import './App.css';
function App() {
return (
<div className="App">
<Peer1 />
<Peer2 />
</div>
);
}
export default App;
// publish at peer1
import PubSub from "pubsub-js"
export const Peer1 = (props)=>{
return (
<div>
<button onClick={()=>PubSub.publish('MY TOPIC', 'hello world!')}>publish from peer1</button>
</div>
)
}
// subscribe at peer2
import PubSub from 'pubsub-js'
import { useState } from 'react';
export const Peer2 = (props)=>{
const [subscriber,setSubscriber] = useState('')
const mySubscriber = (msg,data)=>{
setSubscriber(data)
}
var token = PubSub.subscribe('MY TOPIC', mySubscriber);
return (
<div>
peer2: {subscriber}
</div>
)
}
-
redux
Official Docs: https://redux.js.org/
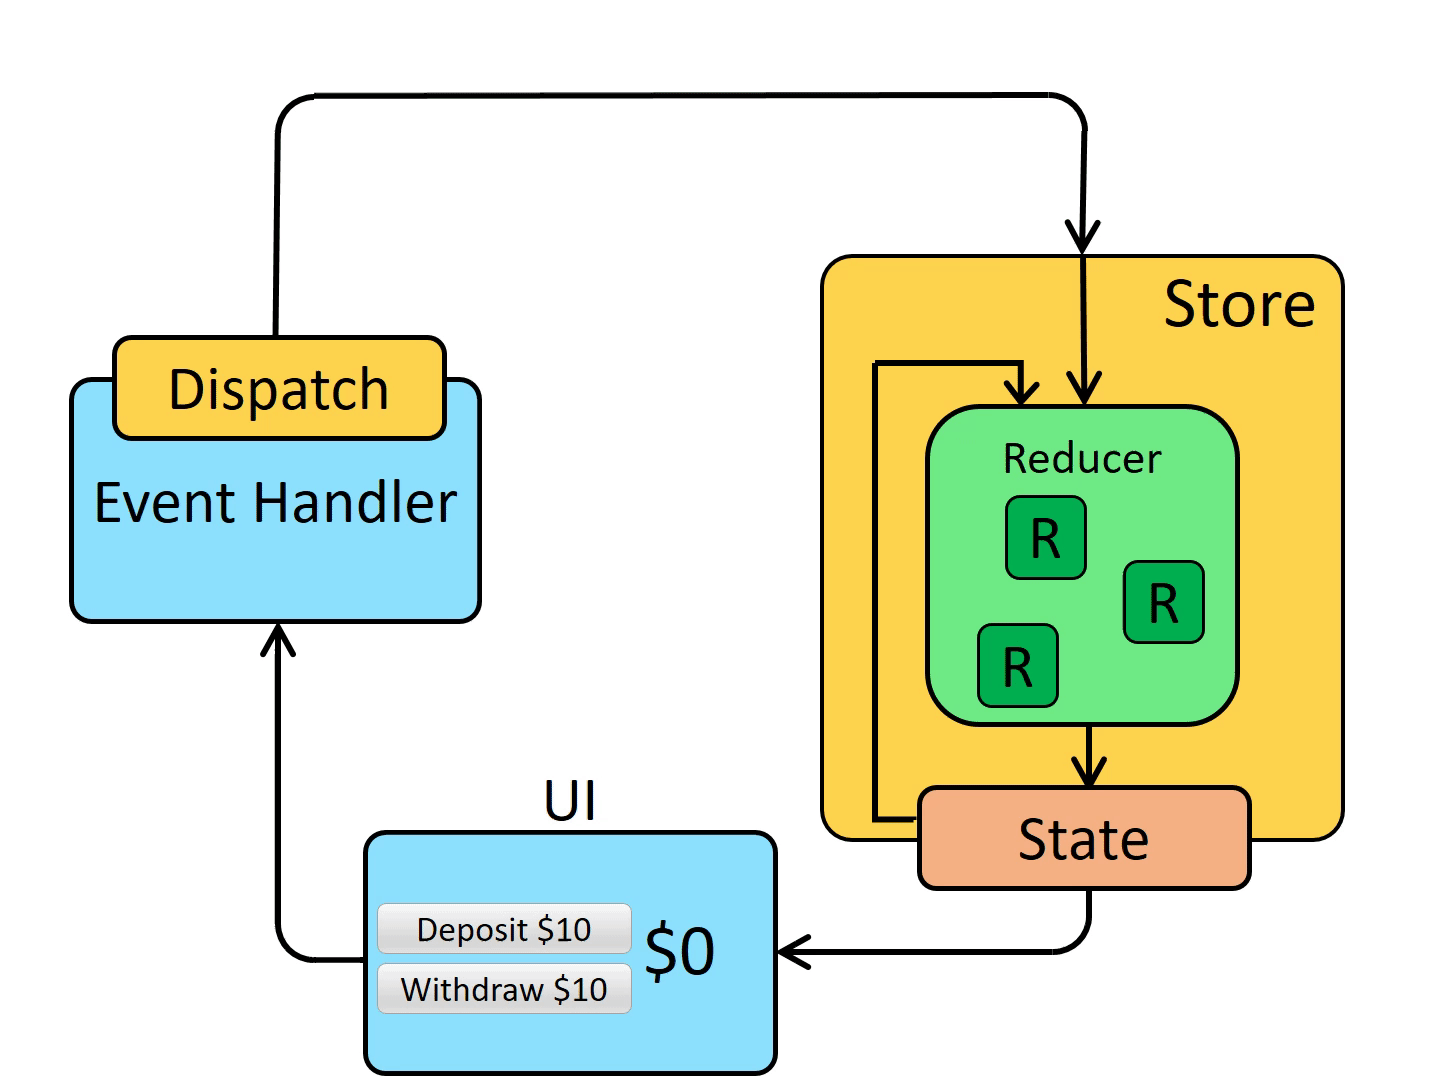
 Redux Mechanism:
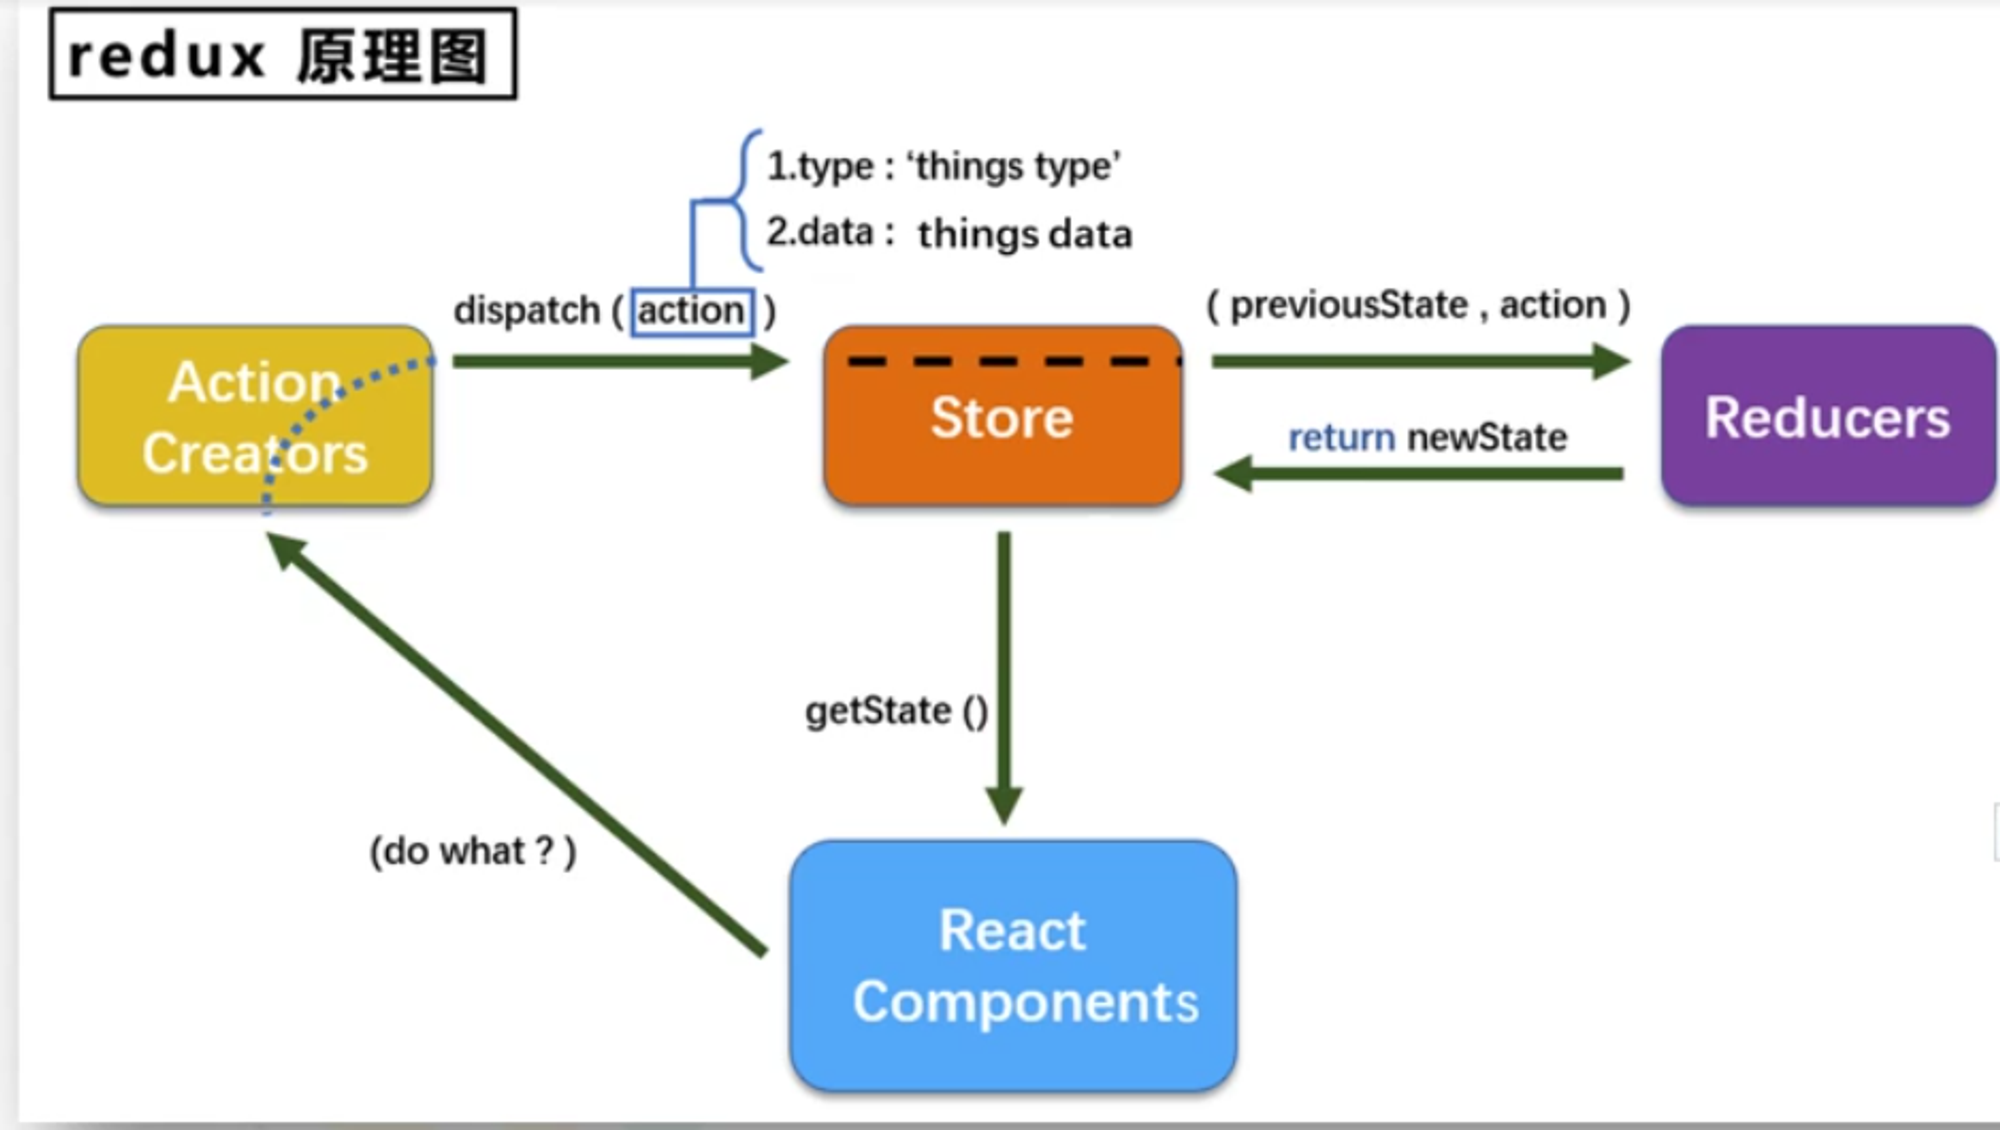 Data movement in redux:
A simple example using redux-toolkit: store.js:
// init store, import reducer when configure store
import { configureStore } from '@reduxjs/toolkit'
import counterReducer from './Counter/counterSlice'
export default configureStore({
  reducer: {
    counter: counterReducer,
  },
})
index.js:
import React from 'react';
import ReactDOM from 'react-dom/client';
import './index.css';
import App from './App';
// import store and Provider(react-redux)
import store from './store'
import { Provider } from 'react-redux'
//use Provider to wrap root component, pass store as props
const root = ReactDOM.createRoot(document.getElementById('root'));
root.render(
  <React.StrictMode>
      <Provider store={store}>
        <App />
      </Provider>,
  </React.StrictMode>
);
counterSlice.js:
// createSlick API
import { createSlice } from '@reduxjs/toolkit'

export const counterSlice = createSlice({
  name: 'counter',
  initialState: {
    value: 0,
  },
  reducers: {
    increment: (state) => {
      // Redux Toolkit allows us to write "mutating" logic in reducers. It
      // doesn't actually mutate the state because it uses the immer library,
      // which detects changes to a "draft state" and produces a brand new
      // immutable state based off those changes
      state.value += 1
    },
    decrement: (state) => {
      state.value -= 1
    },
    incrementByAmount: (state, action) => {
      state.value += action.payload
    },
  },
})

export const { increment, decrement, incrementByAmount } = counterSlice.actions

// The function below is called a thunk and allows us to perform async logic. It
// can be dispatched like a regular action: `dispatch(incrementAsync(10))`. This
// will call the thunk with the `dispatch` function as the first argument. Async
// code can then be executed and other actions can be dispatched
export const incrementAsync = (amount) => (dispatch) => {
  setTimeout(() => {
    dispatch(incrementByAmount(amount))
  }, 1000)
}


export default counterSlice.reducer
Counter.jsx:
import React, { useState } from 'react'
import { useSelector, useDispatch } from 'react-redux'
import {
  decrement,
  increment,
  incrementByAmount,
  incrementAsync
} from './counterSlice'

export function Counter() {
  // useSelector receive a callback func as params, state of store is passed into this callback func by default.
  const count = useSelector((state)=>state.counter.value)
  // create a dispatch instance by useDispatch hook
  const dispatch = useDispatch()
  const [incrementAmount, setIncrementAmount] = useState('2')

  return (
    <div>
      <div>
        <button
          aria-label="Increment value"
          onClick={() => dispatch(increment())}
        >
          +
        </button>
        <span>{count}</span>
        <button
          aria-label="Decrement value"
          onClick={() => dispatch(decrement())}
        >
          -
        </button>
        <button
          onClick={() => dispatch(incrementByAmount(Number(incrementAmount) || 0))}
        >
          Add Amount
        </button>
        <button
          onClick={() => dispatch(incrementAsync(Number(incrementAmount) || 0))}
        >
          Add Async
        </button>
      </div>
    </div>
  )
}
Notice: The example is the simplest use case of redux, there are other complicated usages and maybe better architecture(you can check the official doc). Here I only discussed the most bacis one.
-
mobx
official docs: https://mobx.js.org/README.html
Anything that can be derived from the application state, should be. Automatically.
MobX is a battle-tested library that makes state management simple and scalable by transparently applying functional reactive programming. The philosophy behind MobX is simple:
😙 Straightforward Write minimalistic, boilerplate-free code that captures your intent. Trying to update a record field? Simply use a normal JavaScript assignment — the reactivity system will detect all your changes and propagate them out to where they are being used. No special tools are required when updating data in an asynchronous process.
🚅 Effortless optimal rendering All changes to and uses of your data are tracked at runtime, building a dependency tree that captures all relations between state and output. This guarantees that computations that depend on your state, like React components, run only when strictly needed. There is no need to manually optimize components with error-prone and sub-optimal techniques like memoization and selectors.
🤹🏻♂️ Architectural freedom MobX is unopinionated and allows you to manage your application state outside of any UI framework. This makes your code decoupled, portable, and above all, easily testable.
file structure
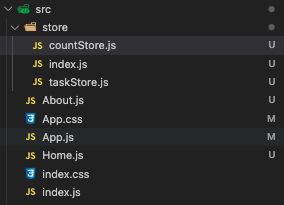
init store.js for each state:
src>store>countStore.js

import { makeAutoObservable } from 'mobx'

class CounterStore {
  // initial value
  count = 0
  constructor() {
    makeAutoObservable(this)
  }
  // define method to change state
  addCount = () => {
    this.count++
  }
}

// export instance
const counter = new CounterStore()
export default countersrc>store>taskStore.js
import { makeAutoObservable } from 'mobx'
// fetch data and store in state by axios and mobx
import axios from 'axios'
class TaskStore {
task = []
constructor() {
makeAutoObservable(this)
}
// func to fetch data and store in state
setTask = async () => {
const res = await axios.get('http://geek.itheima.net/v1_0/channels')
this.task = res.data.data.channels
}
addTask = () => {
this.task.push('ppp')
}
}
const task = new TaskStore()
export default taskA rootStore is used to take all storage components and export them as props:
src>store>index.js

import React from 'react'
// import store component
import counter from './countStore'
import task from './taskStore'

// define root store which takes all store component as props
class RootStore {
  constructor() {
    this.counterStore = counter
    this.taskStore = task
  }
}

const rootStore = new RootStore()
// create context with rootStore
const context = React.createContext(rootStore)
// useContext hook, take context as param, arrow function
const useStore = () => React.useContext(context)
export { useStore }
Use state in other components:
src>Home.js

import { useStore } from "./store"
import { observer } from 'mobx-react-lite'
function Home () {
  // init store instance
  const store = useStore()
  return (
    <div>
      <h1>Home Component</h1>
      <h2>count: {store.counterStore.count}</h2>
      <button onClick={() => store.counterStore.addCount()}>change count</button>
    </div>
  )
}

// components need to be wrapped by observer
export default observer(Home)
which method is the best?
Actually, there are many other methods and libraries that we could use for state management, other than the methods mentioned above. So, among all these methods, which one is the best? The answer is obvious: there is no ‘best solution.’ It depends on the situation and context.
But in certain scenarios, some methods work better than others. For example, if our app only requires data transmission between parent and child components, using props is the most efficient solution without a doubt. If we want to pass data to a deeper nested descendant component, we could use context. The pub-sub model is convenient when the data transmission behavior is similar to pub-sub: one component generates data, others consume data.
For more complicated situations, MobX and Redux are proposed. Actually, MobX and Redux could also be used in the situations mentioned above, but since they are more complicated and include heavy 3rd party libraries, only using them when necessary is my personal advice.